Xtrem Zebra
From£570 (£684incl. VAT / excl. shipping )
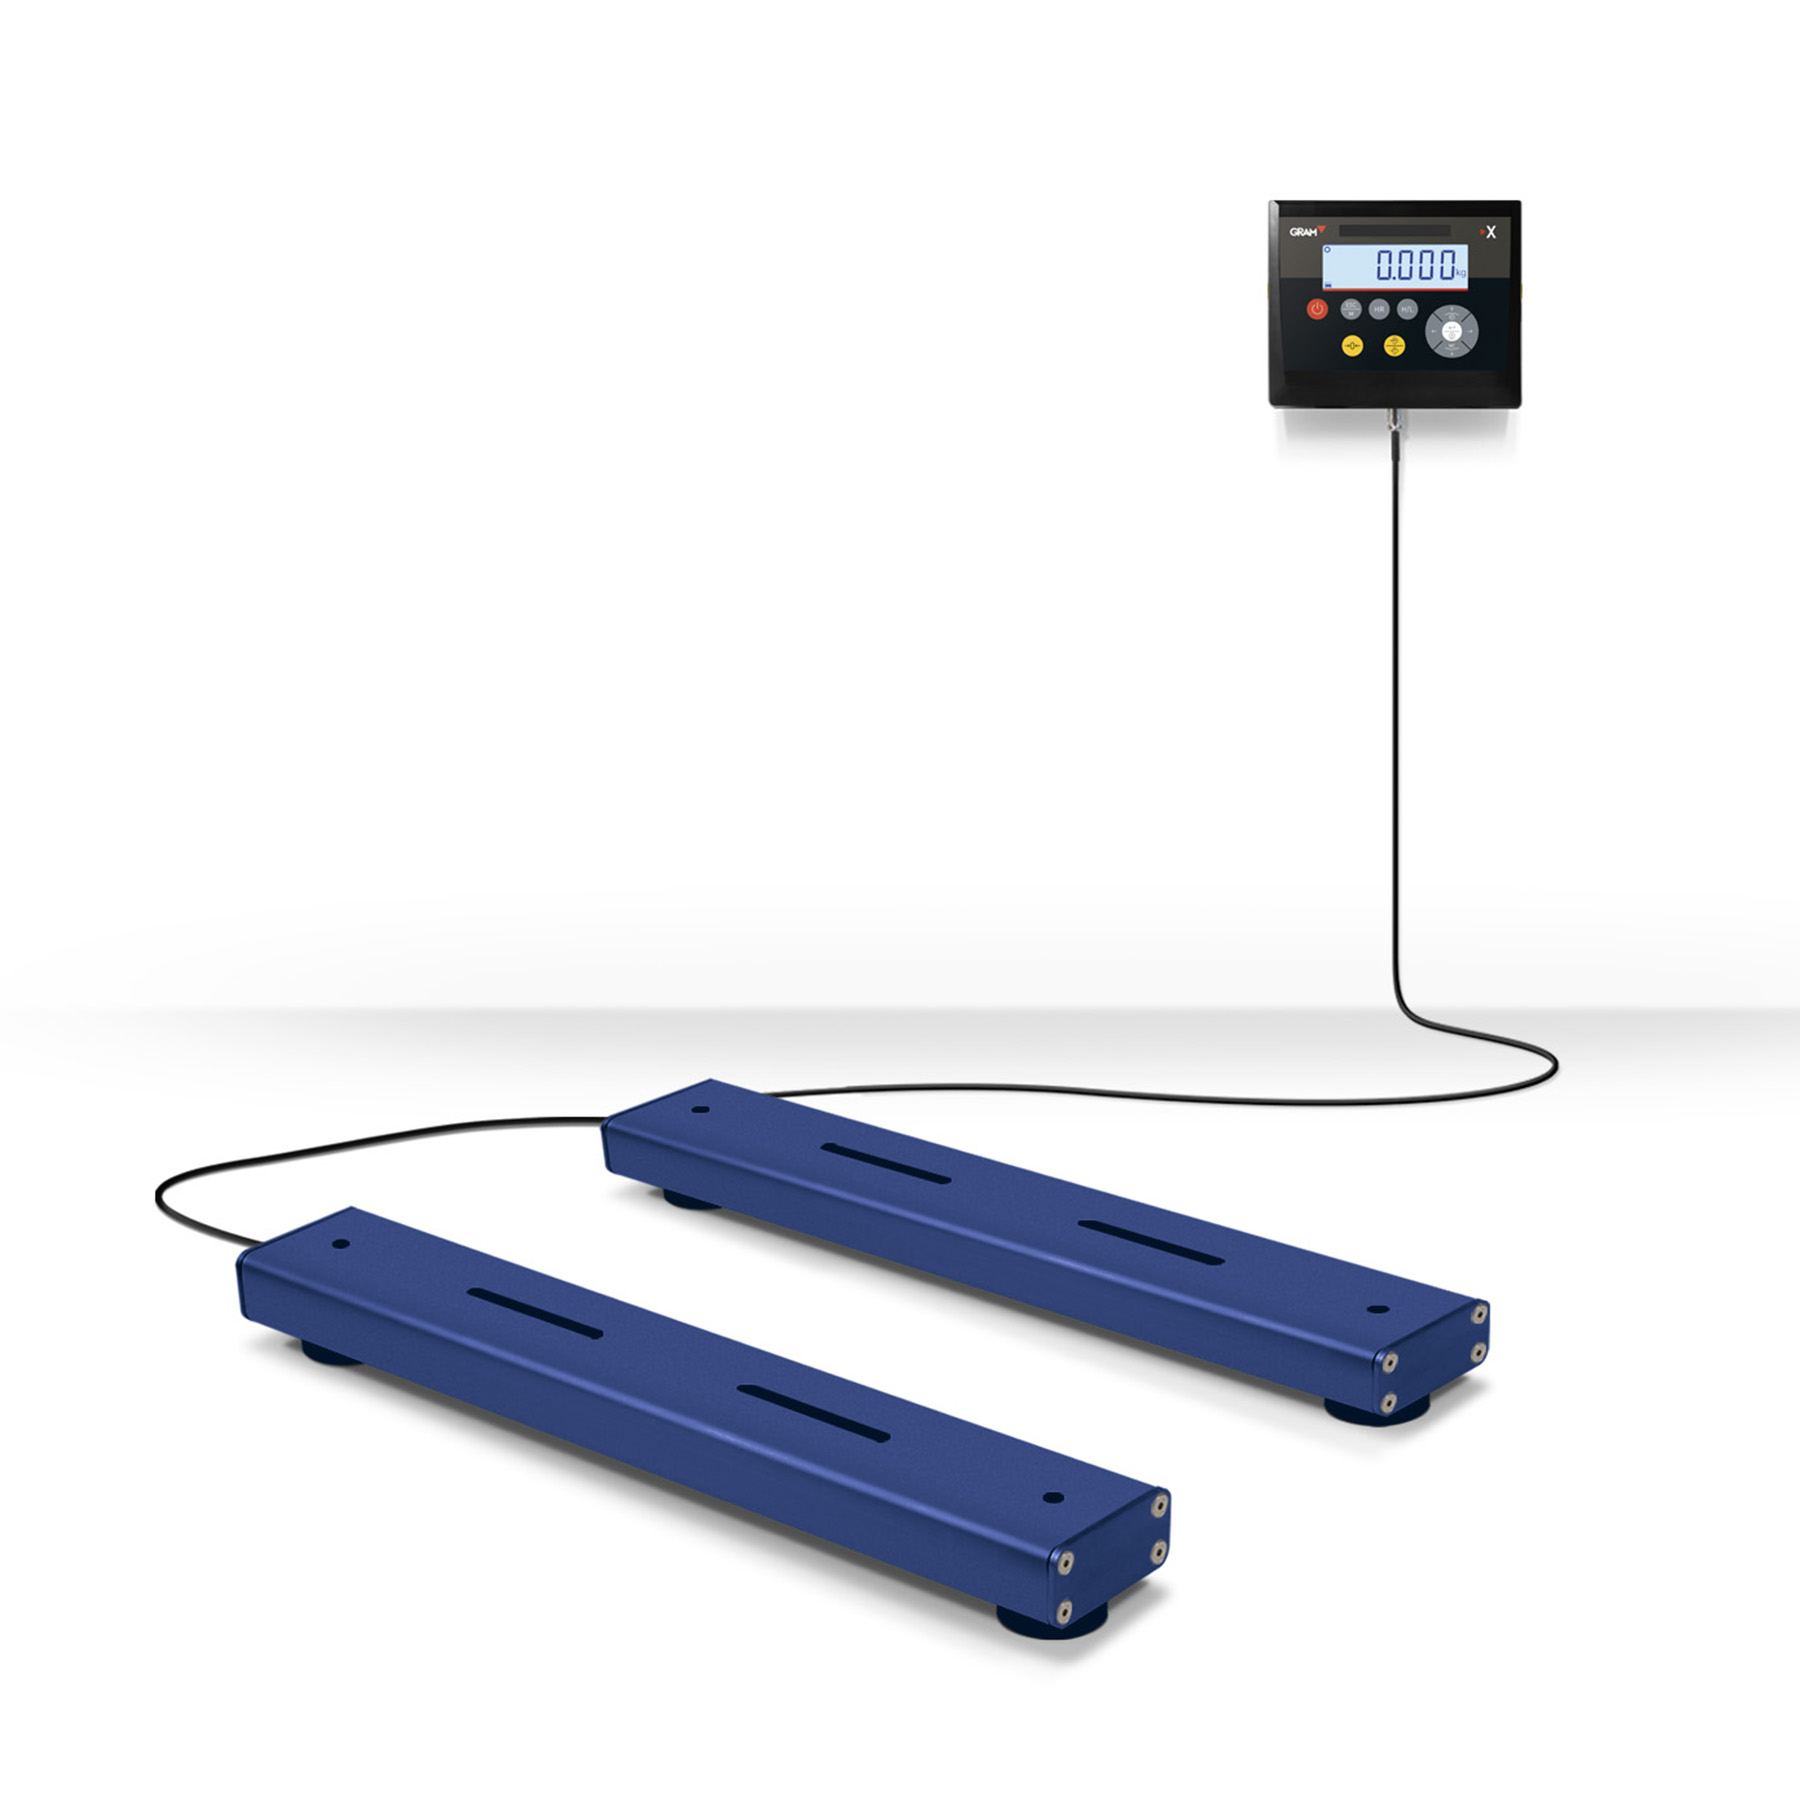
Highlights
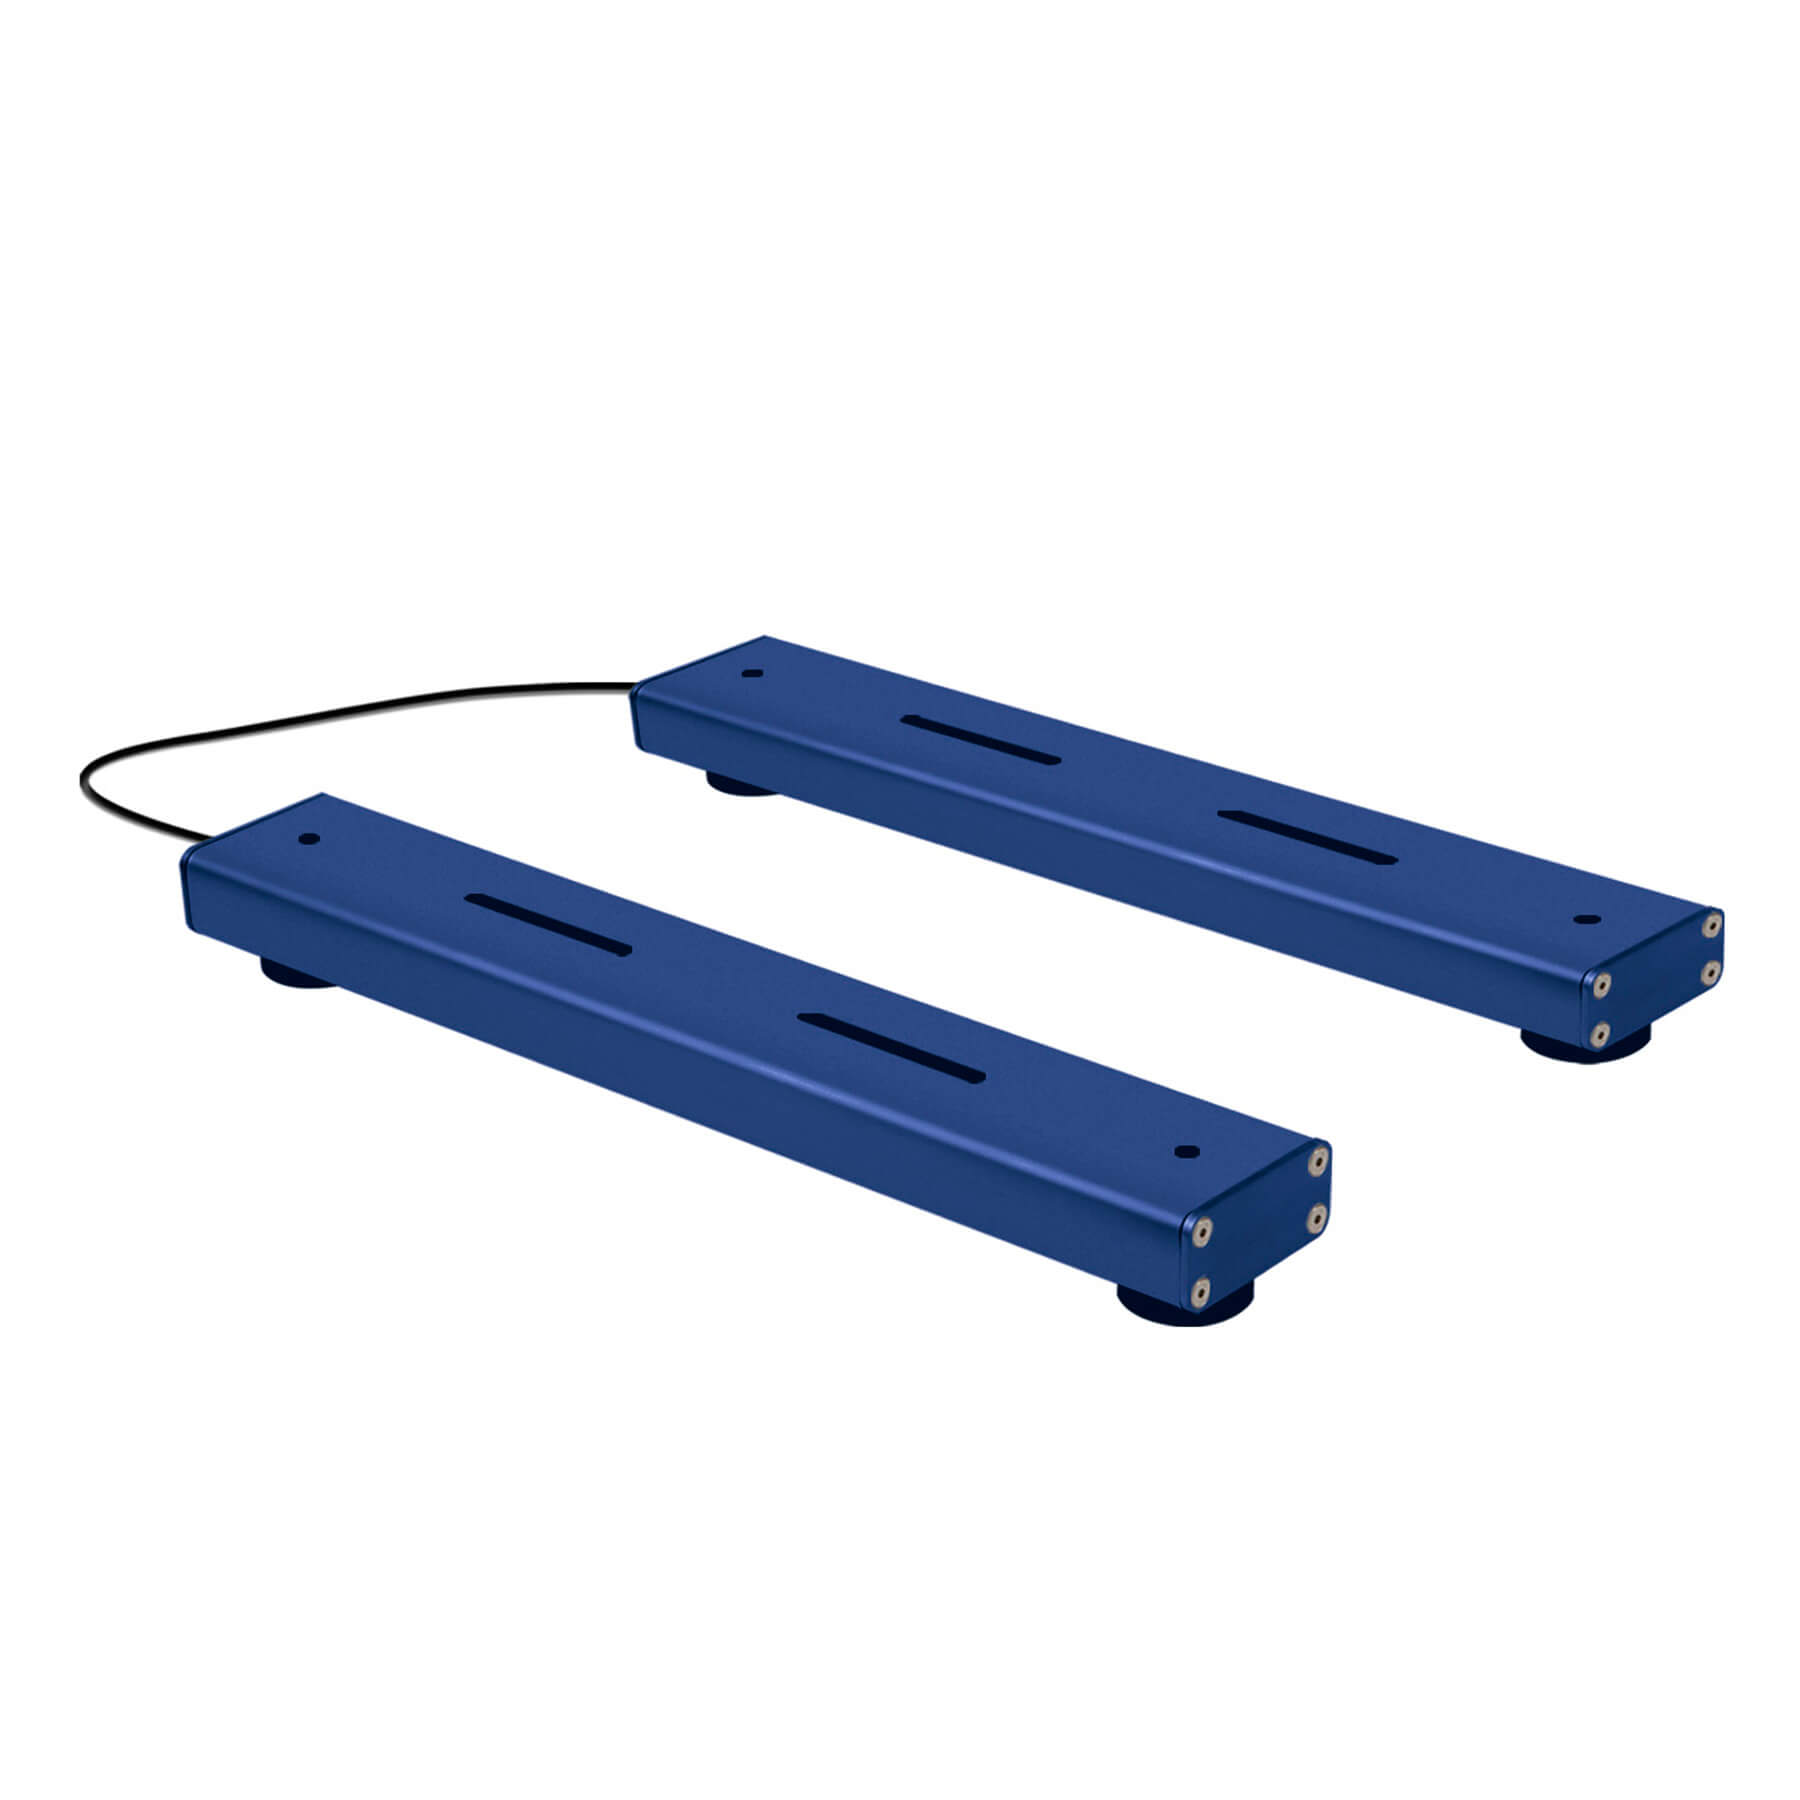
- Pair of versatile weighing bars
- Adaptable weighing solution for a wide range of applications
- Suitable for special-sized pallets, tanks, animal cages or metal bars
- Attachments available to build in a structure on the beams
- Cable length: 4 metres between the bars
- Multiple connectivity options both for PC or Printers
Xtrem Zebra
From£570 (£684incl. VAT / excl. shipping )
1. Model
Select a model2. Indicator
Select an indicator2. Accessories
3. Accessories
NoneHighlights
- Pair of versatile weighing bars
- Adaptable weighing solution for a wide range of applications
- Suitable for special-sized pallets, tanks, animal cages or metal bars
- Attachments available to build in a structure on the beams
- Cable length: 4 metres between the bars
- Multiple connectivity options both for PC or Printers
Technical data
| Model | Xtrem Zebra 8-600 | Xtrem Zebra 8-1,5T | Xtrem Zebra 8-3T | Xtrem Zebra 12-600 | Xtrem Zebra 12-1,5T | Xtrem Zebra 12-3T |
|---|---|---|---|---|---|---|
| Model price | £570 | £570 | £570 | £640 | £640 | £640 |
| Availability | ||||||
| Reference | 72134 | 72135 | 72136 | 72137 | 72138 | 72139 |
| Capacity | Resolution | 600 kg | 200 g | 1,500 kg | 500 g | 3,000 kg | 1 kg | 600 kg | 200 g | 1,500 kg | 500 g | 3,000 kg | 1 kg |
| Weighing units | g, kg, lb, oz | |||||
| Display | Backlit LCD | |||||
| Acoustic warning | Yes | |||||
| Transmission speed (bauds) | 1,200, 2,400, 4,800, 9,600, 19,200, 38,400, 57,600, 115,200 | |||||
| Number of Bits and Inequality | 8 Bits, no parity, 1 bit stop | |||||
| Power | 230 V / 50 Hz (Euro) 11 V AC | |||||
| Battery | 6V-5AH | |||||
| Working temperature | +5 ºC / +35 ºC | |||||
| Sheet thickness | 5 mm | |||||
| Structure material | Steel coated in kiln-fired epoxy resin | |||||
| Load cells | 4 x IP65 nickel-plated steel load cells | |||||
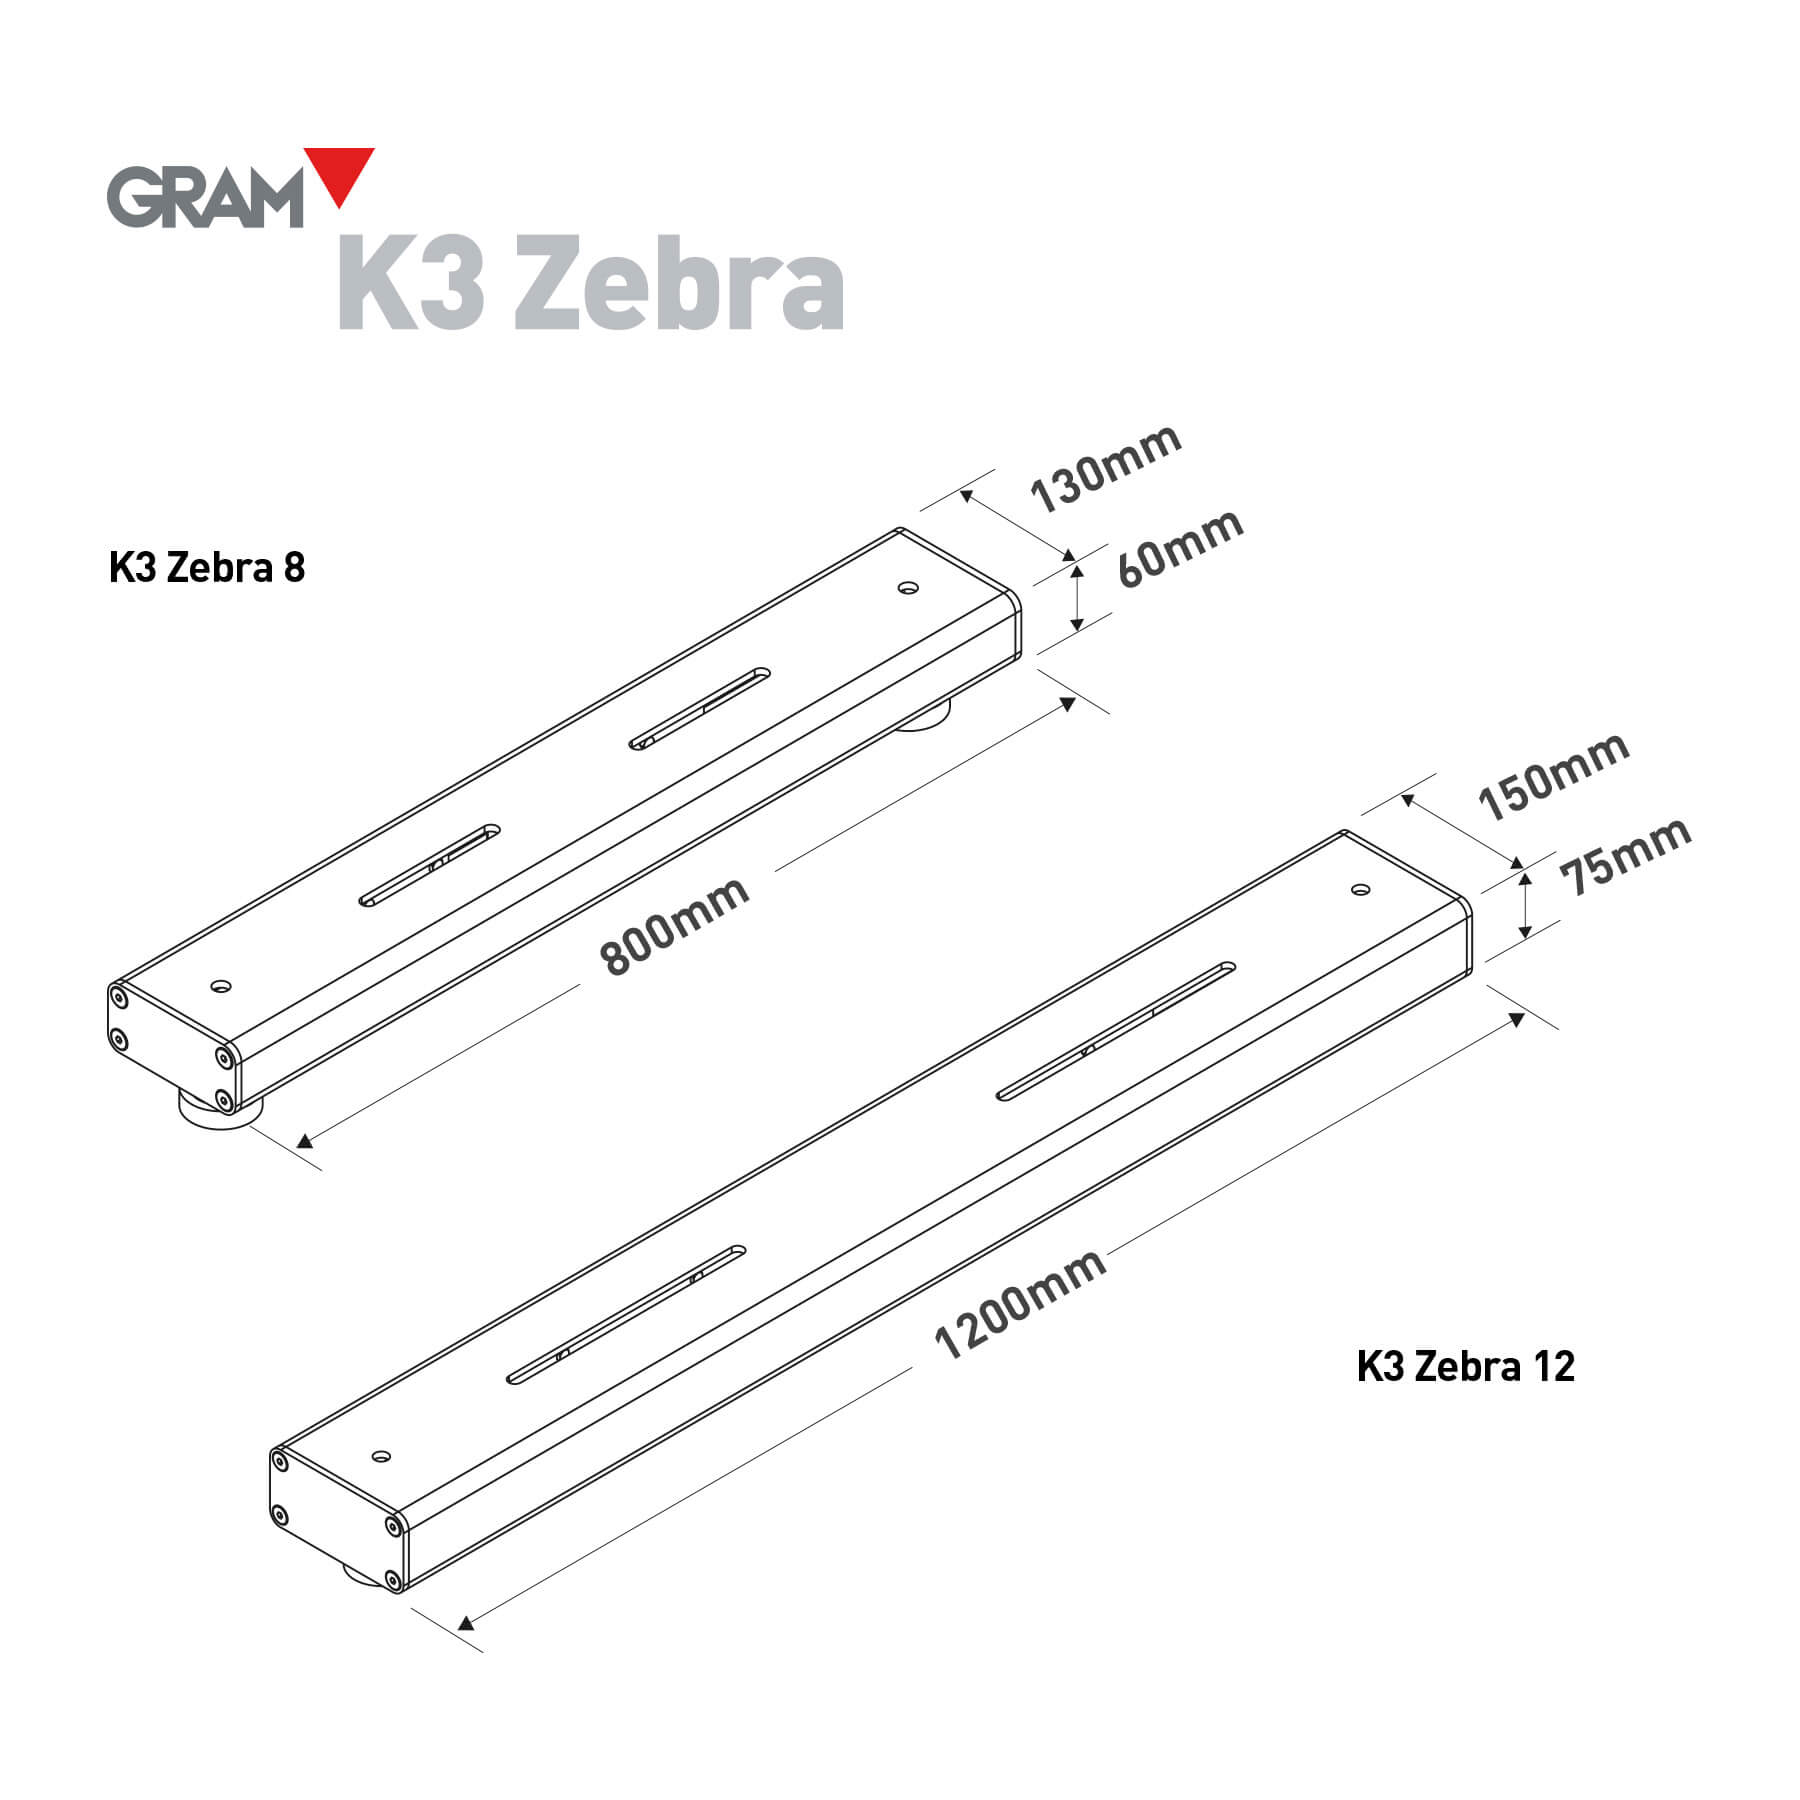
| Beam length | 800 mm | 800 mm | 800 mm | 1,200 mm | 1,200 mm | 1,200 mm |
| Weight | 25 kg | 25 kg | 25 kg | 52 kg | 52 kg | 52 kg |
| Packaging dimensions | 820 × 280 × 135 mm | 820 × 280 × 135 mm | 820 × 280 × 135 mm | 1220 × 320 × 135 mm | 1220 × 320 × 135 mm | 1220 × 320 × 135 mm |
| Total weight with packaging | 25.0 kg | 25.0 kg | 25.0 kg | 52.0 kg | 52.0 kg | 52.0 kg |
Description
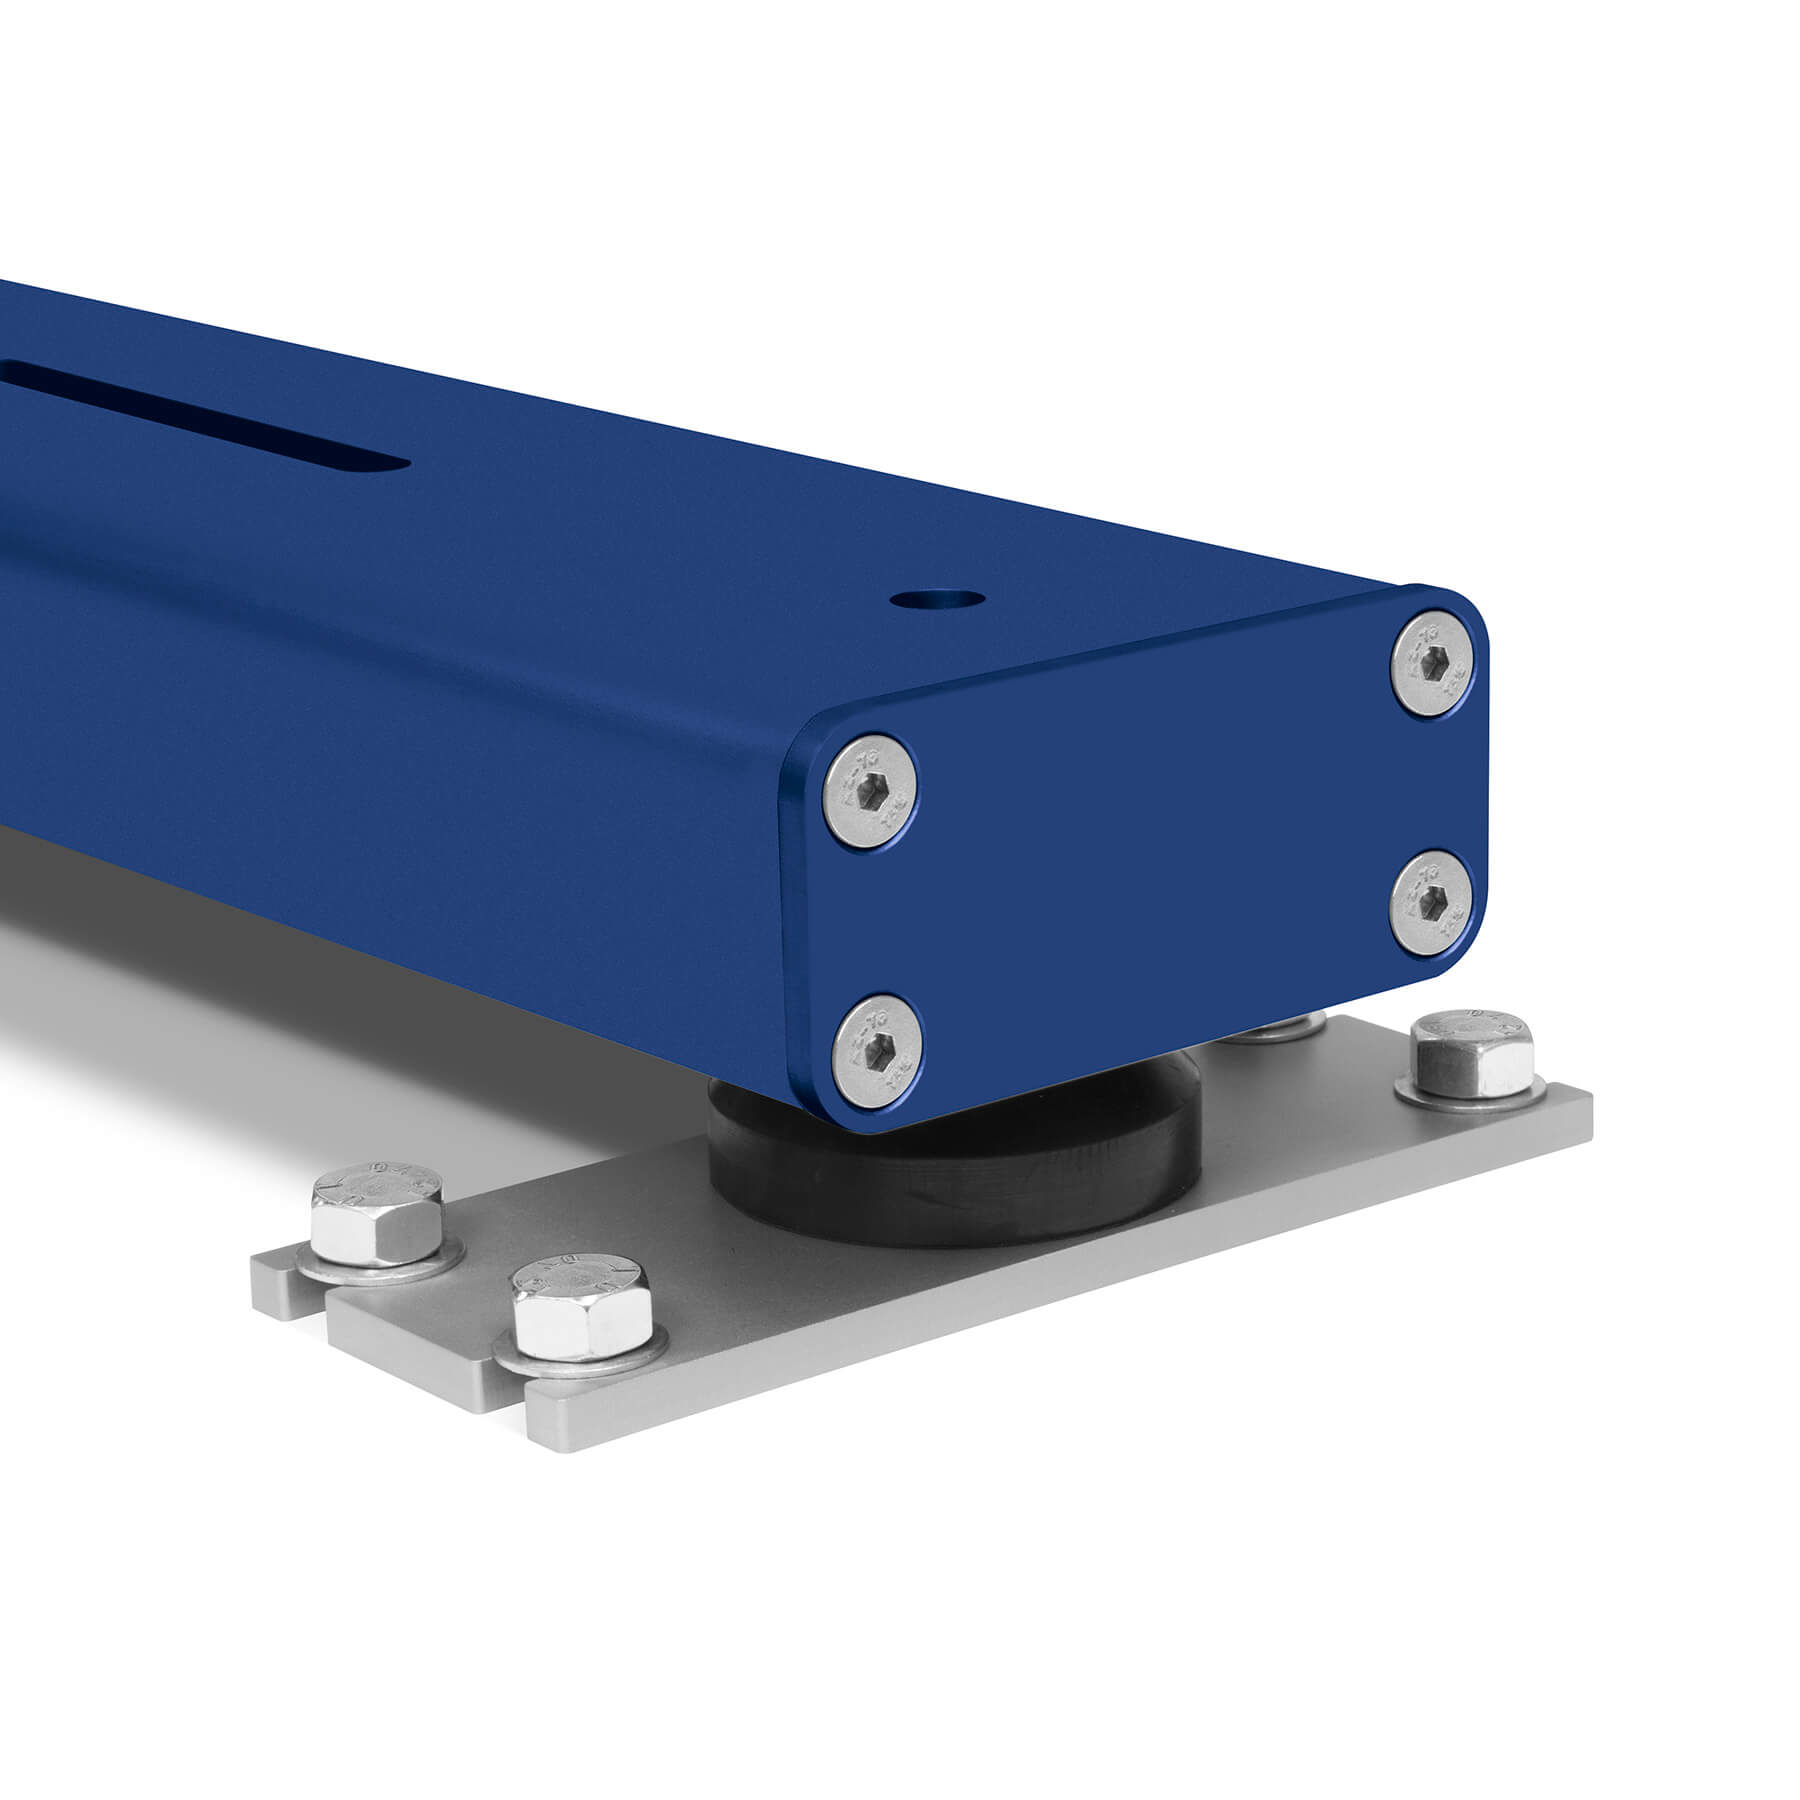
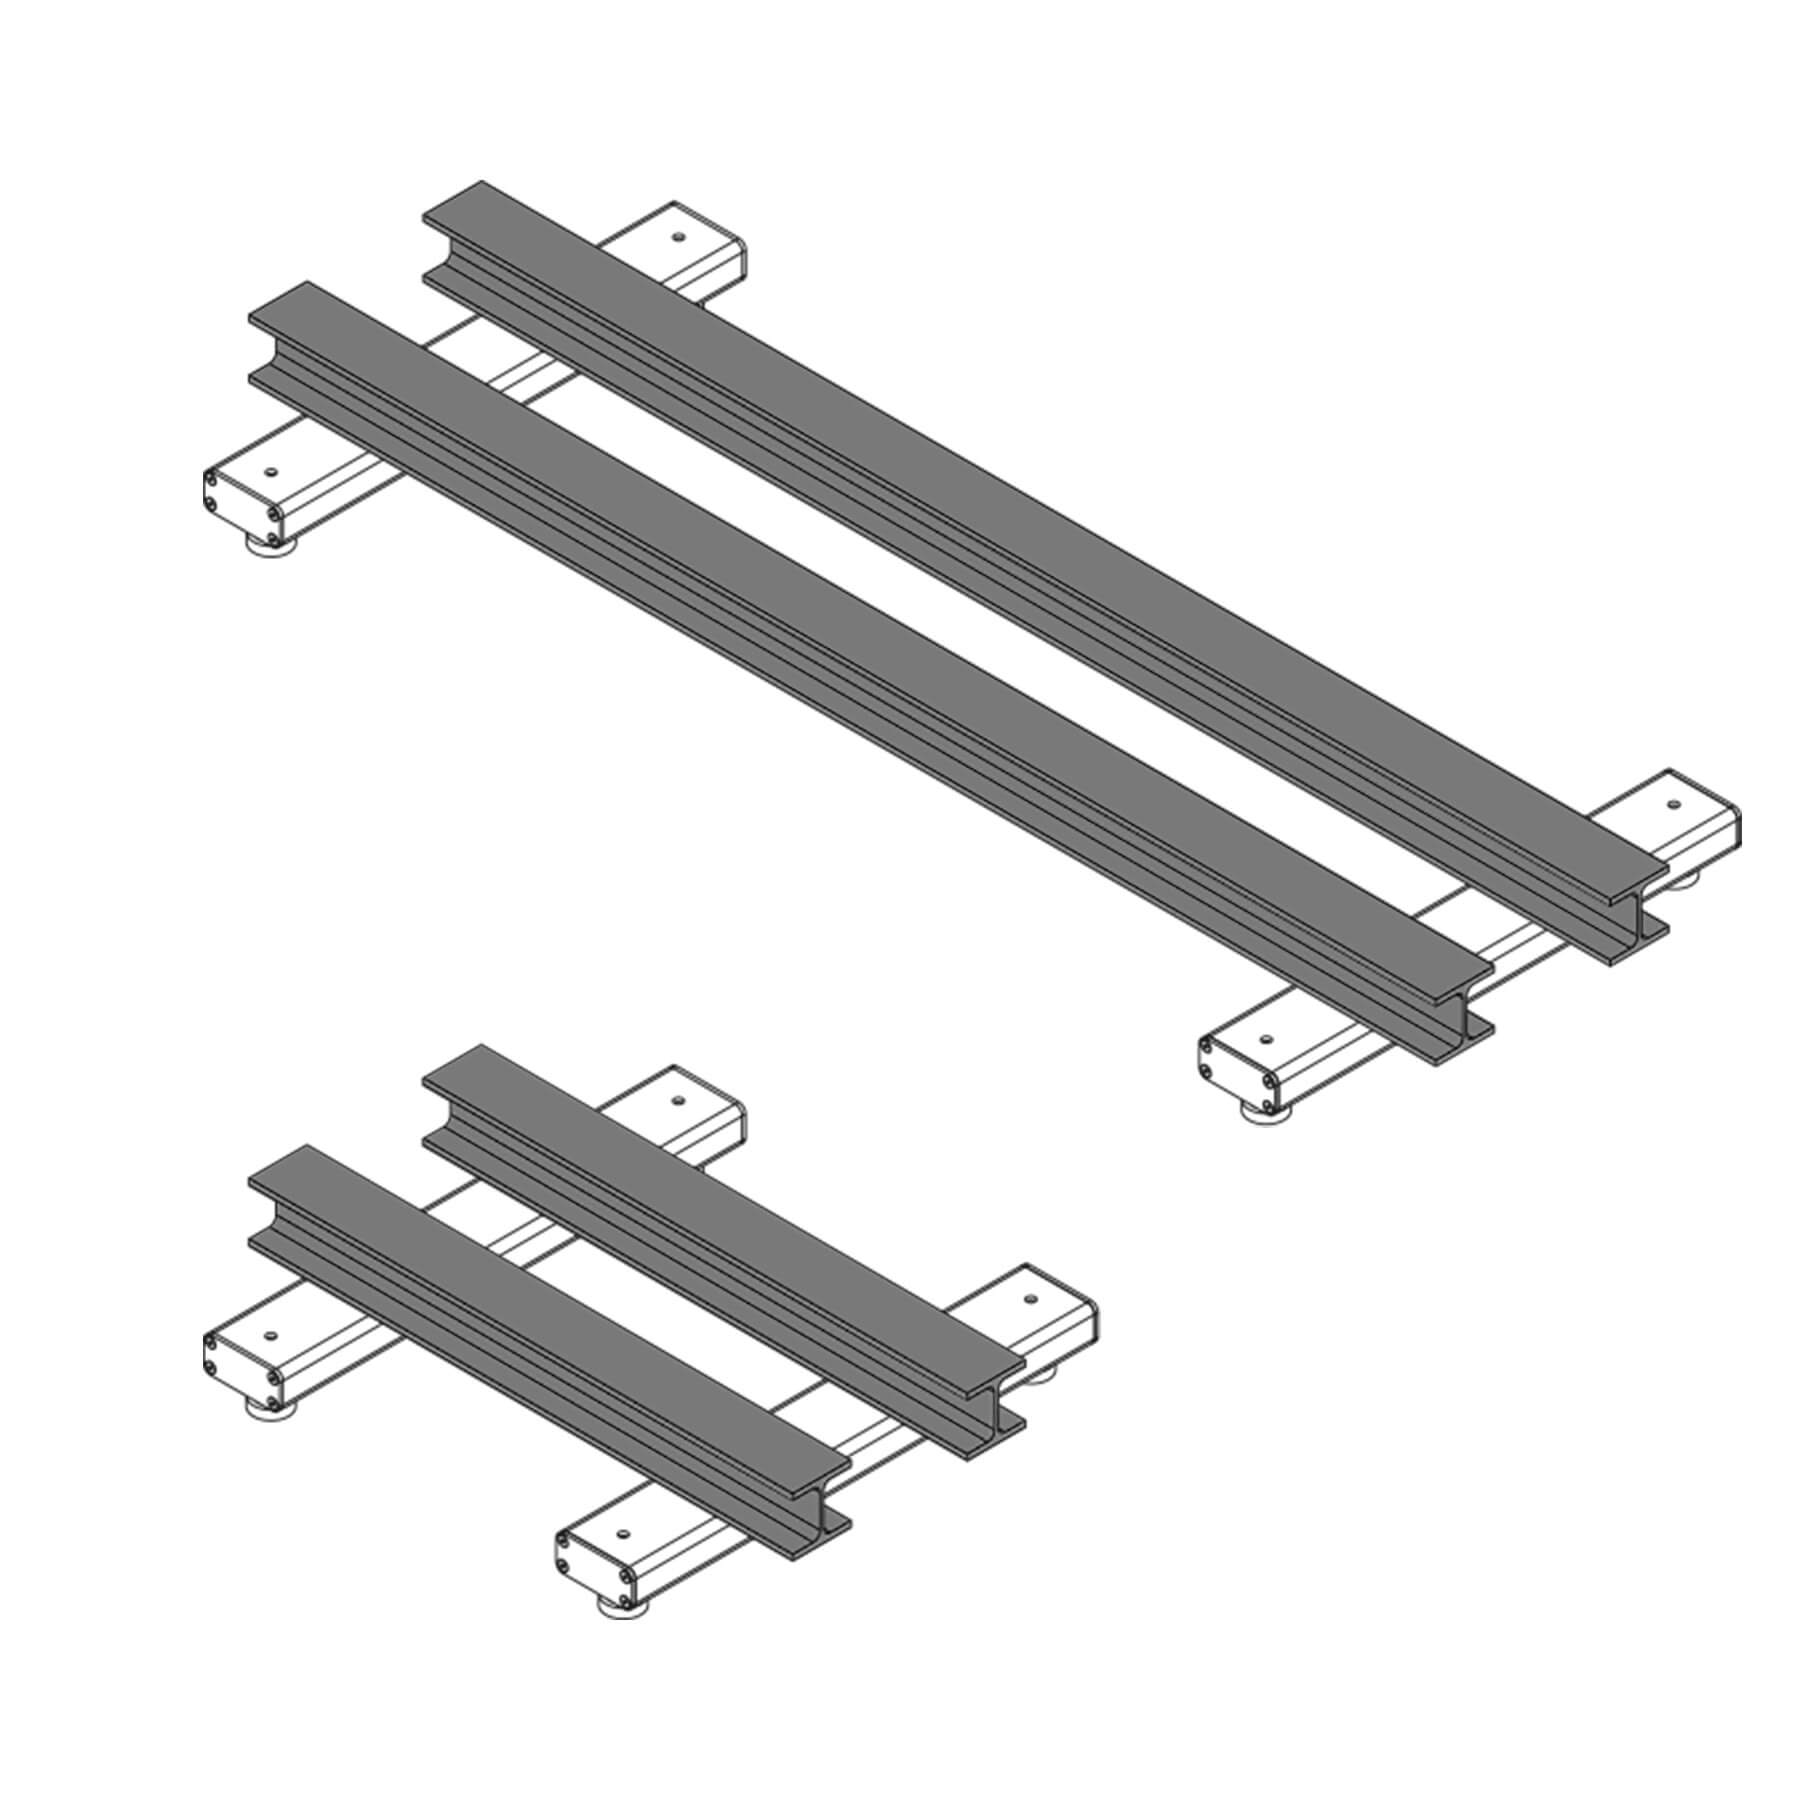
Weighing beams
- Adaptable weighing solution thanks to its flexibility: You can separate the beams up to 4 meters apart to adapt to the item you want to weigh. For instance, suitable to weigh special-sized pallets or long items such as metal bars.
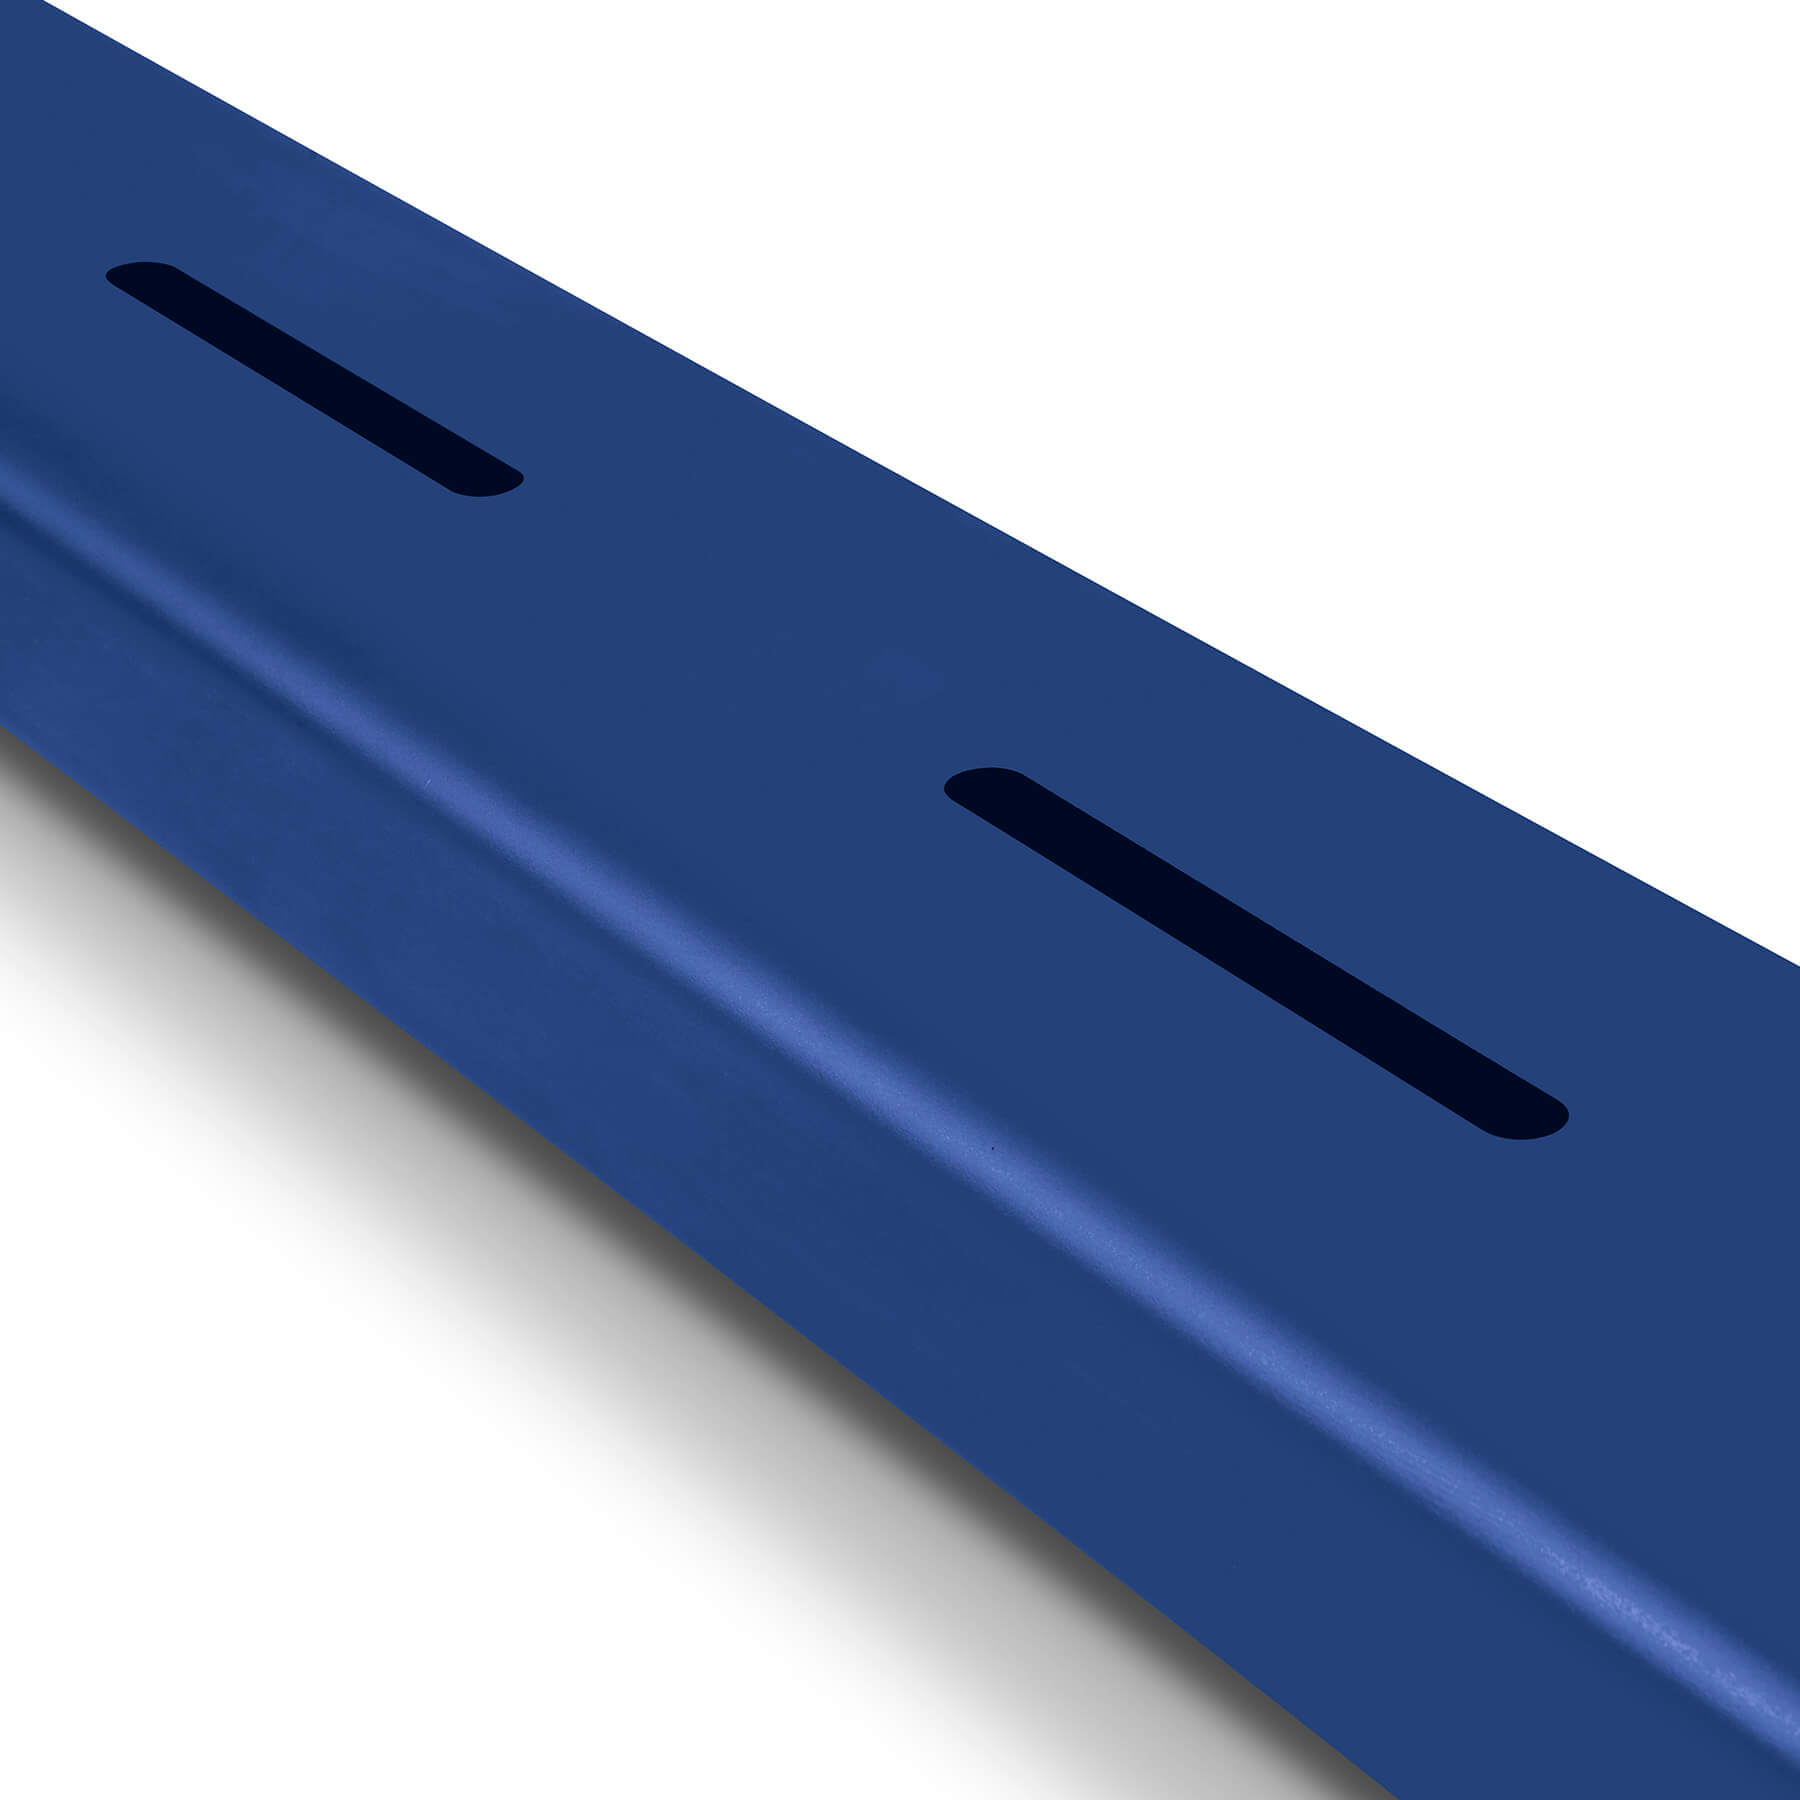
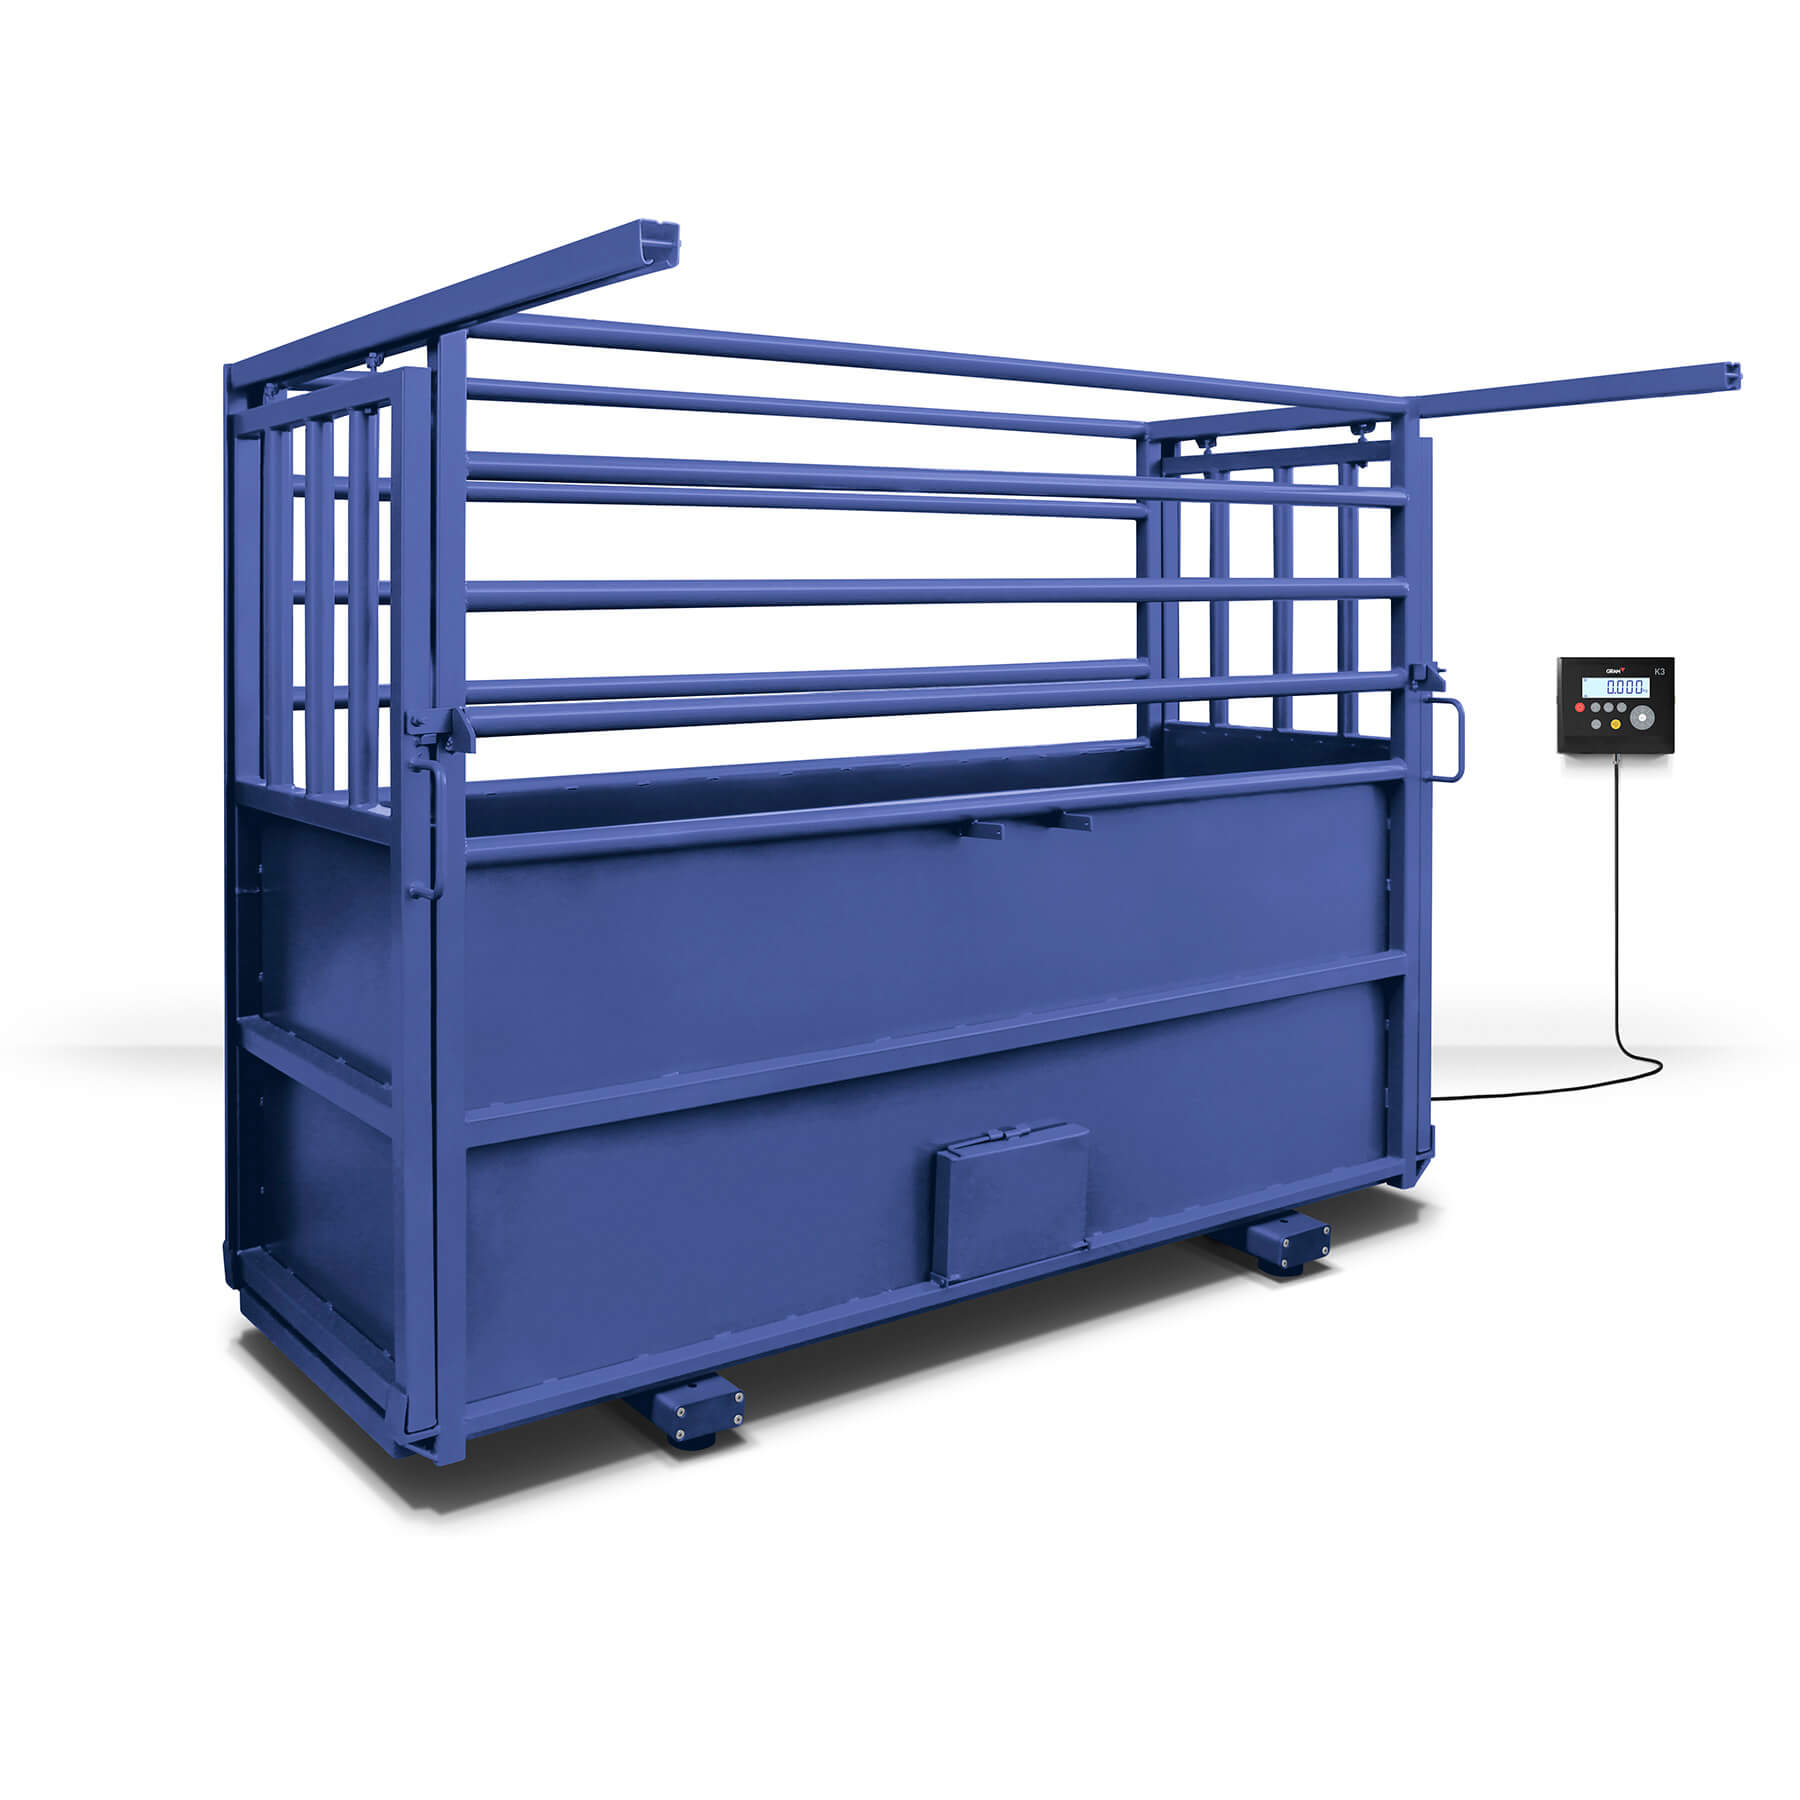
- Attachment holes allow you to attach a structure into the weighing bars. Often used to attach animal cages, waste bins or containers. Take into account that the total capacity of the scale must include the weight of the container. Example: if a container you want to attach weighs 500 kg and you are willing to weigh 300 kg on top of that, you will need a capacity of at least 800 kg.
- Lifting handles to facilitate transport and placement of the load bar scales.
- Its 4 meters wire length between the beams allow for a separation between beams up to 4 meters.
- Each bar is fitted with two load sensors on each end of the beam.
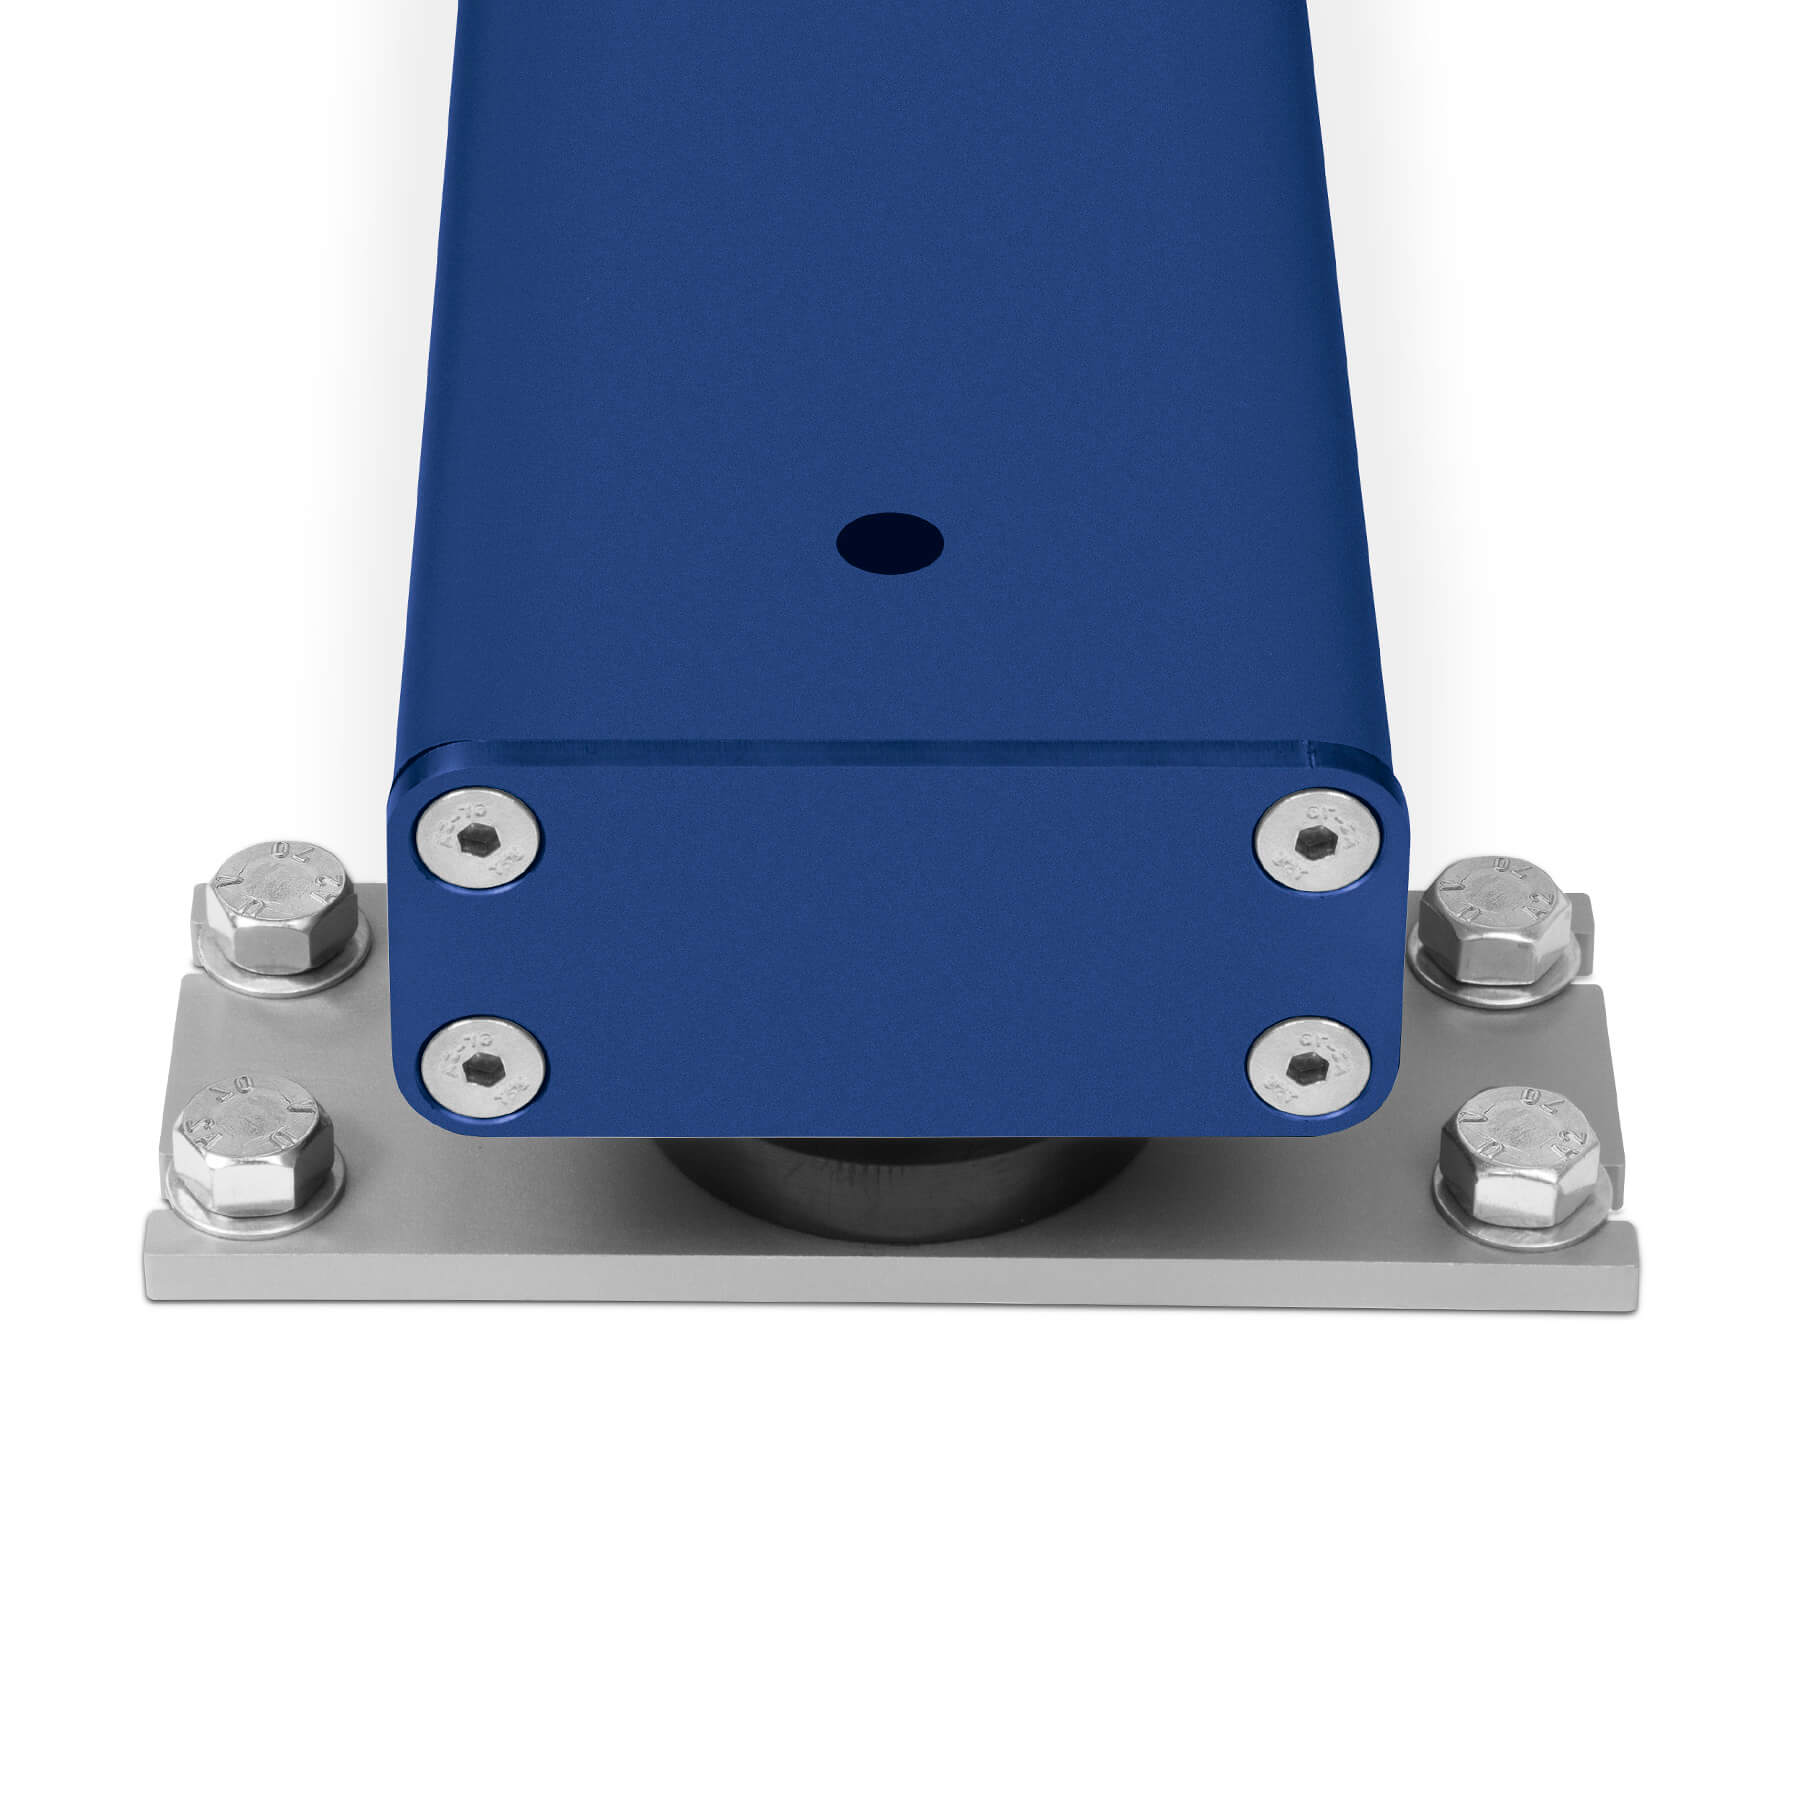
- Two types of feet can be used:
- Flexible feet (default solution): flexible feet allow for a use of the beams where a container, pallet, structure or cage is placed on the beams. Both beams without a load on top are therefore not able to stand horizontally flat.
- Fixed feet (on option): Fixed feet solution is recommended when you need the beams to stand horizontally flat at all times. For example, if you need to weigh long metal bars on the scale. Be aware that fixed feet solution does not work if you want to fix structures, containers or cages on the beams.
- Weighing beams are protected against liquids and solids (IP-67).
- Made in epoxy coated steel, which offers a certain degree of protection against corrosion.
K3 Indicator

- LCD display with automatic bright backlight
- Built in robust ABS
- IP-65 protection against water and solids
- 6 large digits (25 mm)
- 2 data outputs for printer and PC connection
- Can be fixed to a wall without any accessories
- Flexible wall support available if you need to change its position up-down and right-to-left
- Can be fixed to a column (see accessories)
- Rechargeable battery: 30/60 hours duration
- See all functions in the next Functions section
Functions
Checkweighing (Limits Function)
Sort products by weight using background display colours. Set a target weighing range (high and low weight limits) to program the indicator to change its display background to red when the weight is off limits (higher than High value or lower than Low value), while it will change display background to green when the weight is within both weight limits.
Useful application for checkweighing, product sorting or product classification: A user can easily check the weight of several items: for instance discard when display is red, accept when display is green. It reduces the number of errors and alleviates the user’s effort when check weighing a large number of items.
Parts counting (available on request – no additional costs – please contact customer support )
In Piece Counting mode it displays the number of units instead of weight.
The scale has 20 unit weight memories.
Two ways of introducing unit weight:
- Automatic sampling: Place sample of a few units on the scale, indicate the number of units from the given sample, the scale calculates the unit weight with a simple formula: Sample Unit Weight = Sample Total Weight / Sample Units
- Input the unit parts weight manually.
*Piece counting function not available for trade approved scales
Ticket or label printing
Prints tickets with customisable header and footer, sum of weights, date, time and ticket number with either of our printer accessories:
PR4 Compact thermal printer
- Print speed of 130mm / second.
- 58mm ticket width.
- 83mm roll capacity.
- Connects via RS-232C cable (included)
- See video

PR4W Wireless thermal printer
- Print speed of 130mm / second.
- 58mm ticket width.
- 83mm roll capacity.
- Connects via WiFi
Q2 Ticket and label thermal printer
- Print speed: 76 mm/s
- 56mm ticket width
- 90mm roll capacity
- Simplified paper loading
- Detects the start of the label
- Front outlet chute, protected from liquids
- Interchangeable, screw-free print head
- Connects via WiFi
- See Video – Download Catalogue

Tara Function
The displayed weight of the scale is set to zero after, for example, a container is placed on the scale. This allows containers to be tared to measure the net weight of their contents.
- Three different Tara Functions:
- Automatic Tara:
Press the tare button after a container has been placed on the scale to set the scale to 0. After weighing, one of the net weights can be removed from the scale and the scale automatically resets to 0 instead of displaying the weight in the negative range. - Fixed Tara:
Here you press the tare button after a container has been placed on the scale to set it to 0. After weighing the net weight, the tared weight of the container is displayed as a negative weight. This makes it possible to quickly determine net weights in succession when weighing with a standardised container. - Tara Memory:
The scale has an internal memory of up to 20 tare values. This allows the scale to be loaded with a memorised filled container and then simply select the tare weight from the memory. This saves the step of having to tare the empty container before weighing the net weight.
- Automatic Tara:
Dosing function:
- Three digital relay outputs allow for a 2-speed dosing setup.
- Set up two weight values: First weight value to change from speed 1 to speed 2. Second weight value to stop dosification.
- Two dosification modes: filling or emptying mode.
- See video example on dosification
- If you have additional dosing requirements, please get in touch with us.
Hold mode
Activate this function to visualize the weighing reading after removing the load. Very useful when weighing large objects that obstruct the vision of the display, allowing the user to read the weighing value after unloading the weight.
Two modes:
- Hold last weight: It displays the last stable weight captured until a new load is placed on the scale.
- Hold peak mode: It displays the highest weight captured. Useful to calculate weight impact on the scale.
Zero memory for weighing tanks and silos
This function allows for a permanent use of a scale with a load on it. The user can turn off and on the scale with the load on it, and it will show the same weighing reading after starting the scale. Common applications of this function are silos or tanks weighing.
Security
Lockable keyboard to avoid accidental modification of scale settings. It locks all keys except for Tare, Zero and ON/OFF keys, to be able to operate normally with the scale and at the same time keep the scale protected from accidental configuration changes.
Documents
PC Connections
We offer several possibilities to connect your scale to a computer:
USB Output
Standard USB solution to send weighing data to PC in a reliable way in the background using COM port.
You can use it in three ways:
- Send data to our PW Link PC Software, see below section for more information.
- Send data to our pre-programmed Excel file (provided for free). You don’t need to program anything, just connect the cable to PC, download and open our Excel and it will start to capture your weighing data.
- Program your own solution to send weighing data to your PC using our communication protocols described in the manual.
USB Direct connection cable:
Send weighing data to your PC easily with the USB Direct optional accessory, without the need for any additional software. The cable emulates a keyboard to send weighing values directly to any PC application as if your weighing value was a numerical keyboard input.
Please be aware this option has limitations: You cannot program your PC to capture weigh on the background, neither you can send weighing unit, date or time.
Serial Output & Cable (RS-232)
Serial cable to send weighing data to PC in a reliable way in the background using COM port.
You can use it in three ways:
- Send data to our PW Link PC Software, see below section for more information.
- Send data to our pre-programmed Excel file (provided for free). You don’t need to program anything, just connect the cable to PC, download and open our Excel and it will start to capture your weighing data.
- Program your own solution to send weighing data to your PC using our communication protocols described in the manual.
PW-Link Software:
- Send data to our PC Software EX-Link with a serial cable (RS232) or USB cable.
- Create weighing reports with the following data: Number of weighing, Date, Time, Weight and Unit.
- Export weighing reports to a spreadsheet format or pdf if you prefer to print them out.
- Weighing reports can be personalised with company logo and information.
- You can set up a local folder where to save automatically all weighing reports.
- Software available in English, German, French and Spanish.
Power supply
Powered via cable with 110 – 240V / 50-60 Hz (Euro) 11 VAC
Battery powered service time: 25 – 60 hours (depending on use).
FAQs
K3/ K3X displays
The K3W display loses the connection when the vehicle moves away from the Xtrem platform (WiFi). The connection is re-established as soon as the vehicle (with the K3W display) approaches again:

Download ⤓ Gram Ex-Link

K3 & K3i (71423 ABS / 71641 inox) → EX Link or own programming (communication protocol)


| COMMAND | RESPONSE |
| v | Returns a message with the firmware version "GRAM K3 Vxxxx". |
| $ | Weight request. The display transmits a weight information sequence in PC0 format. |
| z | The scale performs an automatic zero setting. |
| f | Increases the value of the digital filter (1..4). If the filter corresponds to 4, the "f" command sets the filter to 1. |
| H1 | Programmes the first header line of the document and returns "H1 OK"". |
| H2 | Programmes the second header line of the document and sends back "H2 OK"". |
| H3 | Programmes the third header line of the document and sends back "H3 OK"". |
| F1 | Programmes the footer of the document and returns "F1 OK"". |
| 0 | 1 | 2 | 3 | 4 | 5 | 6 | … | 30 | 31 | 32 | 33 | 34 | 35 |
|---|---|---|---|---|---|---|---|---|---|---|---|---|---|
| STX | C | C | L | L | L | L | … | L | L | L | L | L | EXT |
K3X & K3Xi (72098 ABS / 72099 inox) → EX Link or data export (Cont, Stab) to the PC

Configuration of the K3 & K3i display:


Download:
⤓ Z3 Ticket Header Setup


Xtrem PC Software
You can download the PC Xtrem software in our download centre under "Software".
Documents:
⤓ PC Xtrem Software
⤓ Installation Ethernet PDF
The following video shows you how to set up your Xtrem industrial scales in the Ethernet network:
Step-by-step instructions to add your Xtrem scale to the Ethernet network:
By default, all scales are already configured for operation with DHCP → ON. DHCP means that the router automatically assigns an IP to the scale as soon as the scale is connected to the network (here via Ethernet). Each time the router is reset, this IP can change. The Ethernet option is configured to automatically connect to a DHCP (Dynamic Host Configuration Protocol) enabled network.
[stepbystep_guide steps="1,2,3,4,5,6"]Xtrem scales are equipped as standard with an RS232 serial interface, which allows them to be connected directly to a COM port of a PC (or any other compatible device). In addition to the standard RS232 serial interface, the scale can be equipped with a second optional interface. This additional interface does not replace the RS232 serial interface, which can continue to be used simultaneously. The optional interfaces available allows connection to a local area network (LAN) via an UTP cable (optional ethernet interface) or via a Wi-Fi 811.2 connection. This setup offers a highly flexible architecture, being able to combine a point-to-point connection of the scale with different compatible indicator models and, at the same time, supply information to any device connected to the same local area network.
Example:

The Xtrem B scale is equipped with a secondary Ethernet interface. This configuration allows a K3iX indicator to be connected via the scale's RS232 cable, while simultaneously connecting the scale to a local area network using a UTP cable. Any other device on the same local network can connect to this scale.
In the example, both the personal computer with PC-XTREM and the tablet can be operating with the same scale. Scale Xtrem C only has the standard RS232 serial interface, and connects directly to a PC COM port. Other devices do not have access to this scale.
The Xtrem A scale, on the other hand, features a secondary Wi-Fi interface, enabling its connection to the local area network. This allows both the tablet and the PC to operate with this scale concurrently.
In the given example, the laptop is connected to three different scales. When running the PC-XTREM application, the software scans the system to identify connected scales. It will display the various scales available, allowing the user to select the desired one. The application supports opening multiple instances simultaneously, offering control over each of the available scales.
Connect your scale to your local network (PC)
- Network AP SSID: Name of the network (SSID) Enter the name of the WiFi network you want to connect to.
- AP password: Enter the password for the selected network.
- Network IP address: Enter the IP address of the Xtrem device in the selected network. It must be within the range of this network. This data can be assigned automatically with the DHCP option.
- Network DHCP: Automatically assigns an IP address to the Xtrem device if the "ON" option is selected. If "OFF" is selected, the IP must be entered manually.
How to make the appropriate settings with just a few clicks is shown in the video from minute 2:36:
Connect your scale to your local network (app, mobile phone)
With the Xtrem Wifi module you can connect the scale to a local network. It can function simultaneously as an Access Point (AP) and as a Station (STA).
Both operating modes are activated on delivery.
When first used, only the AP mode is functional, which has a very limited range and capacity. To connect the device to your own local network, you must set the connection parameters for the desired WiFi network. This configuration cannot be carried out via the K3X terminal. Alternatively, it can be carried out using two applications:
Step by step instructions:
- access the WiFi network settings of your Android device and select the WiFi network of your Xtrem scale. The initial SSID is GRAM_01 and the password is "12345678".
- a system message appears within a few seconds after the cccess the WiFi network settingsonnection is established, that the selected network does not allow Internet access. Tap this notification to open the dialogue window.
- confirm that you want to stay connected to the GRAM_01 network even if you do not have Internet access. On some Android versions, an option may appear to memorise this preference: Enable the option to Save this preference to avoid these steps every time you connect to the scale's access point.
When you open the app for the first time, a screen without a connection to a scale appears:
Tap on the top left hand corner to establish a connection with an Xtrem scale.


The connection screen opens, on which you can the option of saving the connection settings for various Xtrem scales.
When you are connected to the scale, you can access the scale's configuration options by clicking on the button in the centre of the left-hand side of the screen.

On this settings screen you will find the options for configuring the connection of the Xtrem scale to a WiFi network:


To edit one of these values, tap on the label with the content of the desired setting.
A dialogue window opens for entering or editing configuration information.

Configuration options for connecting the scale to a WiFi network:
| Net SSID | Name of the WiFi network to which the scale should connect. |
| NET PWD | Password for access to the WiFi network |
| NET DHCP (on/off) | Dynamic assignment of the IP address of the scale according to the is connected to the network. |
| IP address | IP address of the scale for input if you prefer a static IP assignment (NET DHCP deactivated). |
Once the desired configuration options have been changed, they will only take effect the next time the scales are restarted. This means that for them to take effect, it is necessary to switch the scale off and on again.
Documents
⤓ Network as STA PC Xtrem (PC)
⤓ Network as STA PC Xtrem (App, Mobile Phone)
Xtrem platform interface options
Xtrem scales are equipped as standard with an RS232 serial interface, which allows them to be connected directly to a COM port of a PC (or any other compatible device). In addition to the standard RS232 serial interface, the scale can be equipped with a second optional interface. This additional interface does not replace the RS232 serial interface, which can continue to be used simultaneously. The optional interfaces available allows connection to a local area network (LAN) via an UTP cable (optional ethernet interface) or via a Wi-Fi 811.2 connection. This setup offers a highly flexible architecture, being able to combine a point-to-point connection of the scale with different compatible indicator models and, at the same time, supply information to any device connected to the same local area network.
Example:
The Xtrem B scale is equipped with a secondary Ethernet interface. This configuration allows a K3iX indicator to be connected via the scale's RS232 cable, while simultaneously connecting the scale to a local area network using a UTP cable. Any other device on the same local network can connect to this scale.
In the example, both the personal computer with PC-XTREM and the tablet can be operating with the same scale. Scale Xtrem C only has the standard RS232 serial interface, and connects directly to a PC COM port. Other devices do not have access to this scale.
The Xtrem A scale, on the other hand, features a secondary Wi-Fi interface, enabling its connection to the local area network. This allows both the tablet and the PC to operate with this scale concurrently.
In the given example, the laptop is connected to three different scales. When running the PC-XTREM application, the software scans the system to identify connected scales. It will display the various scales available, allowing the user to select the desired one. The application supports opening multiple instances simultaneously, offering control over each of the available scales.
The A/D converter can transmit up to 3840sps.
A maximum rate of 50 measurements per second can be set in the PC Xtrem software (see figure), either via the RS232 interface or the Ethernet option (but not via the WiFi option).
The Xtrem module can acquire load cell signals at two rates, which are configurable with PC-XTREM:

12sps (samples per second) option. One measurement every 80ms (12 per second). This is the factory setting best suited for a static scale.
Option 50sps. One measurement every 20ms (50 per second). The analogue-to-digital converter (A/D converter) that the Xtrem module is equipped with supports much higher sampling rates*****.
(*****6.25, 7.5, 12.5, 15, 25, 30, 50, 60, 100, 120, 200, 240, 400, 480, 800, 960, 1600, 1920, 3200 & 3840sps MCLK=4.9152 MHz)
The command for the Xtrem module to send the weight information continuously (at a specific frequency) is as follows:
| PC sends to Xtrem 01 | Xtrem scale 01 response | |
| “\u00020001E10110000\u0003” | à | |
| ß | “\u00020100r01071AW 0.0kgT 0.0kgS01561\u0003\r\n” | |
| (50ms) | ||
| ß | “\u00020100r01071AW 0.0kgT 0.0kgS01561\u0003\r\n” | |
| (50ms) | ||
| ß | “\u00020100r01071AW 0.0kgT 0.0kgS01561\u0003\r\n” |
The command to end sending in continuous mode is:
| PC sends to Xtrem 01 | Xtrem scale 01 response | |
| “\u00020001E10100000\u0003” | à |
The transmission frequency is programmed with the W0013 command (see point "9.4 0013h Output rate in stream mode" in the communication protocol document). Example of programming the transmission of the weight every 2 seconds:
| PC sends to Xtrem 01 | Xtrem scale 01 response | |
| “\u00020001W001304200000\u0003” | à |
*****The RS485 interface is half-duplex: Only one device can use the interface at the same time. Communication should always take place on request from the "master" device.
If you configure the Xtrem module to send data continuously and several devices are connected to the same RS485 bus, it is very likely that communication errors will occur.
Documents
⤓ Communication Protocol
The device must be connected to the same network as the scale.
Xtrem platforms
Xtrem scales are equipped as standard with an RS232 serial interface, which allows them to be connected directly to a COM port of a PC (or any other compatible device). In addition to the standard RS232 serial interface, the scale can be equipped with a second optional interface. This additional interface does not replace the RS232 serial interface, which can continue to be used simultaneously. The optional interfaces available allows connection to a local area network (LAN) via an UTP cable (optional ethernet interface) or via a Wi-Fi 811.2 connection. This setup offers a highly flexible architecture, being able to combine a point-to-point connection of the scale with different compatible indicator models and, at the same time, supply information to any device connected to the same local area network.
Example:
The Xtrem B scale is equipped with a secondary Ethernet interface. This configuration allows a K3iX indicator to be connected via the scale's RS232 cable, while simultaneously connecting the scale to a local area network using a UTP cable. Any other device on the same local network can connect to this scale.
In the example, both the personal computer with PC-XTREM and the tablet can be operating with the same scale. Scale Xtrem C only has the standard RS232 serial interface, and connects directly to a PC COM port. Other devices do not have access to this scale.
The Xtrem A scale, on the other hand, features a secondary Wi-Fi interface, enabling its connection to the local area network. This allows both the tablet and the PC to operate with this scale concurrently.
In the given example, the laptop is connected to three different scales. When running the PC-XTREM application, the software scans the system to identify connected scales. It will display the various scales available, allowing the user to select the desired one. The application supports opening multiple instances simultaneously, offering control over each of the available scales.
Yes, however you must adjust the feet and make sure that the air in your bubble leveller is central:

It is possible to replace a defective Xtrem module board if repair at GRAM is unavailable.

Order this part with the help of our technical support:
32394 Kit module Xtrem M + summing box JB03 (the unit should be pre-configured with the parameters of the scale. To ensure this, please provide the serial number of your scale (S/N0000xxxx).
Replacement steps for your Xtrem board:
- Remove the defective Xtrem module and fit the replacement unit.
- Check the power supply (LED) before connecting it to the junction box.
- Connect the new Xtrem module to the junction box according to the below connection diagram "XTREM_JB03 for EQ00210".
- Connect the scale to the K3X indicator and test if it is functioning. If necessary, check and replace any defective load cells.

K3/ K3X displays : Functions
The K3W display loses the connection when the vehicle moves away from the Xtrem platform (WiFi). The connection is re-established as soon as the vehicle (with the K3W display) approaches again:
Download ⤓ Gram Ex-Link
K3 & K3i (71423 ABS / 71641 inox) → EX Link or own programming (communication protocol)
| COMMAND | RESPONSE |
| v | Returns a message with the firmware version "GRAM K3 Vxxxx". |
| $ | Weight request. The display transmits a weight information sequence in PC0 format. |
| z | The scale performs an automatic zero setting. |
| f | Increases the value of the digital filter (1..4). If the filter corresponds to 4, the "f" command sets the filter to 1. |
| H1 | Programmes the first header line of the document and returns "H1 OK"". |
| H2 | Programmes the second header line of the document and sends back "H2 OK"". |
| H3 | Programmes the third header line of the document and sends back "H3 OK"". |
| F1 | Programmes the footer of the document and returns "F1 OK"". |
| 0 | 1 | 2 | 3 | 4 | 5 | 6 | … | 30 | 31 | 32 | 33 | 34 | 35 |
|---|---|---|---|---|---|---|---|---|---|---|---|---|---|
| STX | C | C | L | L | L | L | … | L | L | L | L | L | EXT |
K3X & K3Xi (72098 ABS / 72099 inox) → EX Link or data export (Cont, Stab) to the PC
Configuration of the K3 & K3i display:
Download:
⤓ Z3 Ticket Header Setup
K3/ K3X displays : Hardware and Accessories
The dimensions of the K3 and K3X display are as follows:


The light is connected to the K3 display and the power source via the 9-pin connector.
In the menu, call up "d out" → Enter→Mode → test → Enter:
rele 1 → red
rele 2 → green
rele 3 → yellow
Similar products
-
 AccurexRX FoxFrom£390
3,000 kg
Capacity (up to)Adjustable weighing beam scales for weighing large objects
- GramPluto£390
300 kg
Capacity (up to)Parcel scale for weighing large objects
- GramK3 ZebraFrom£555
3,000 kg
Capacity (up to)Versatile weighing beam scales. Multiple connectivity options
- GramBull£2,290
Forklift
Pair of forks for a forklift truck with an integrated weighing systemWiFi
Wireless connection between forklift sensors and weighing indicator located in the cabin2,000 kg
Capacity (up to)Latest generation Wireless Forklift weighing system
- GramK3i Zebra SFrom£2,990
3,000 kg
Capacity (up to)Versatile weighing beams built in stainless steel. Multiple connectivity options


